Hello
The guide at ZFSBootMenu doesn’t quite work without enabling networking and then installing ubuntu-desktop/ubuntu-server and so on. You also don’t have a browser installed either and a few other packages. Sithuk’s script is better as it enables networking and can install the ubuntu-server/ubuntu-desktop/kubuntu/etc. You still don’t have FireFox installed and likely other packages due to chroot not support snap packages. However, if you don’t want to go into the terminal and run commands, you may find it more preferable as you simply configure the script and it does the rest.
So, I decided to go a different way. This guide is only for UEFI systems.
First, install Ubuntu as you normally do. However, don’t use LVM/ZFS/encryption in the installer. You can even install alongside Windows if you want (you will have to disable Bitlocker but the installer will tell you how as well).
Once installed, boot up Ubuntu and open a terminal. Run this command to install the requisite packages:
sudo apt install zfsutils-linux zfs-initramfs -y
Once done, reboot back into the live USB. Open Disks in Ubuntu to mount the Ubuntu partition, and click the mount location. It should open up in Nautilus. Right-click > Open in Terminal. Finally, run sudo rm ./swap.img to remove the swap file. Using swapfile in ZFS can lead to a deadlock. If you want swap, you will likely want to use a swap partition instead (though by default, it is unencrypted. Therefore, you likely want to forgo swap partition entirely or set up encrypted swap, which will not be covered in this guide).
While in that terminal, run this command to get the hostid of your install:
xxd ./etc/hostid
Then, swap the bytes (2 characters) as x86_64 is little endian and run sudo zgenhostid -f {your swapped hostid}
You can verify by running xxd /etc/hostid (without the ./ at the beginning) and seeing if it matches
In my case, it showed 00000000: 2289 234d Therefore, I must run sudo zgenhostid -f 4d238922
Once done, you can exit the terminal.
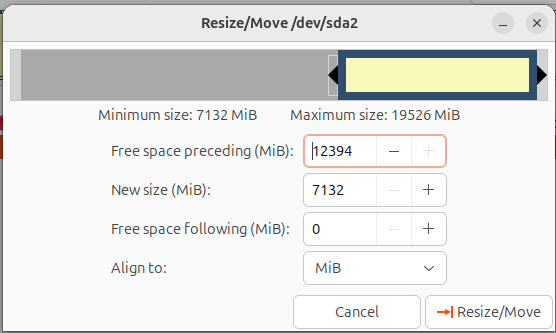
Open GParted. Rightclick on the Ubuntu partition > Unmount (you will need to close Nautilus if you have it open). Then, rightclick > Resize/Move. Shrink the partition as much as you can from the right on the slider at the top and move it at the end. Here is the after in my case:
Click Resize/Move and then click the checkmark. It may give you a warning your disk could be unbootable. Click ok. It may also give a GParted bug error. In that case, first resize and click the green checkmark. Then move the partition to the right separately.
Also note the disk path. In my case, it is /dev/sda. Now, open up a terminal window and run sudo cgdisk {disk path}
Use the up/down arrow keys to go to the free space created earlier. Then, use the left/right arrow keys to go to New and press Enter. For the First and last sector, you can leave it at default and just press Enter. In the hex code, enter bf00. You can give it a partition name or ignore it. Once done, use the left/right arrow keys to go to Write. If it asks you, type yes. Then you can use the left/right arrow keys to go to quit. If it says the kernel may use old partition tables and tells you to reboot, then run sudo partprobe {device path}.
Use GParted to determine the partition path. Don’t confuse it with the device path. In my case, it is /dev/sda3.
Open terminal. Run these commands:
sudo -i
source /etc/os-release
export ID
Run this command for unencrypted ZFS:
zpool create -f -o ashift=12 \
 -O compression=lz4 \
 -O acltype=posixacl \
 -O xattr=sa \
 -O relatime=on \
 -o autotrim=on \
 -O checksum=sha256 \
 -o compatibility=openzfs-2.2-linux \
 -m none zroot "$POOL_DEVICE"
Replace the compatibility with openzfs-2.1-linux if using Ubuntu 22.04 rather than Ubuntu 24.04. You can also create RAID-Z or mirrors or other fancy configuration. You can also change some of the properties if you want.
For encrypted ZFS:
echo 'SomeKeyphrase' > /etc/zfs/zroot.key
chmod 000 /etc/zfs/zroot.key

zpool create -f -o ashift=12 \
 -O compression=lz4 \
 -O acltype=posixacl \
 -O xattr=sa \
 -O relatime=on \
 -O checksum=sha256 \
 -O encryption=aes-256-gcm \
 -O keylocation=file:///etc/zfs/zroot.key \
 -O keyformat=passphrase \
 -o autotrim=on \
 -o compatibility=openzfs-2.2-linux \
 -m none zroot {partition path}
After creating the zpool, we can create the filesystems:
zfs create -o mountpoint=none zroot/ROOT
zfs create -o mountpoint=/ -o canmount=noauto zroot/ROOT/${ID}
zfs create -o mountpoint=/home zroot/home

zpool set bootfs=zroot/ROOT/${ID} zroot
Finally, we can export and import:
zpool export zroot
zpool import -N -R /mnt zroot
Note that if you are using ZFS encryption, run this next command as well and type your password:
zfs load-key -L prompt zroot
After that (regardless of if you are using encryption or not), run this to mount the filesystem:
zfs mount zroot/ROOT/${ID}
zfs mount zroot/home
Force a refresh with udevadm trigger
Now that we have created the filesystem, it is time to copy the files over. Open Disks and mount the original Ubuntu partition. Copy the path and run the command (notice the leading slash):
rsync -avxHAXWS --numeric-ids {path to mounted Ubuntu partition}/ /mnt/
cp /etc/zfs/zroot.key /mnt/etc/zfs
Finally, chroot in:
mount -t proc proc /mnt/proc
mount -t sysfs sys /mnt/sys
mount -B /dev /mnt/dev
mount -t devpts pts /mnt/dev/pts
chroot /mnt /bin/bash
Though these services are enabled, we can make sure just in case:
systemctl enable zfs.target
systemctl enable zfs-import-cache
systemctl enable zfs-mount
systemctl enable zfs-import.target
If you are using encrypted install, run this next command:
echo "UMASK=0077" > /etc/initramfs-tools/conf.d/umask.conf
Finally, update the initramfs (regardless of if you use encrypted or non-encrypted install)
update-initramfs -c -k all
Finally, run this command to set kernel flags:
zfs set org.zfsbootmenu:commandline="quiet splash" zroot/ROOT
If you are using encrypted ZFS, run:
zfs set org.zfsbootmenu:keysource="zroot/ROOT/${ID}" zroot
Run exit to exit the chroot.
In FireFox, download ZFSBootMenu
Open Disks and mount the partition type that has EFI System. That is the ESP partition. Mount it and click the moutpoint to open in Nautilus. Right-click > Open in Terminal. Run these commands in the new terminal:
cd EFI
mkdir ZBM
cp ~/Downloads/zfsbootmenu-release-x86_64-v2.3.0-vmlinuz.EFI ./ZBM/VMLINUZ
Finally, exit the terminal and close Nautilus. Return to the original terminal.
To install with rEFInd, run this command:
sudo apt install refind -y
If it asks if you want to automatically install to ESP, press no.
cp /usr/lib/shim/shimx64.efi.signed.latest /home/ubuntu/Downloads/shimx64.efi
cp /usr/lib/shim/mmx64.efi /home/ubuntu/Downloads/mmx64.efi
refind-install --shim /home/ubuntu/Downloads/shimx64.efi
cp /boot/efi/EFI/refind/grubx64.efi /home/ubuntu/Downloads/grubx64.efi
apt install binutils -y
echo sbat,1,SBAT Version,sbat,1,https://github.com/rhboot/shim/blob/main/SBAT.md >/home/ubuntu/Downloads/sbat.csv
echo refind,1,Roderick W. Smith,refind,0,0.13.2-1,https://www.rodsbooks.com/refind >>/home/ubuntu/Downloads/sbat.csv
objcopy --set-section-alignment '.sbat=512' --add-section .sbat=/home/ubuntu/Downloads/sbat.csv --adjust-section-vma .sbat+10000000 /home/ubuntu/Downloads/grubx64.efi
cp /home/ubuntu/Downloads/grubx64.efi /boot/efi/EFI/refind/grubx64.efi
Now we deal with the boot entries
mount -t efivarfs efivarfs /sys/firmware/efi/efivars
We want to remove the direct rEFInd boot. Run efibootmgr to see the list of UEFI boot entries. Find the boot order number. In my case, it is 0005 based on my output:
BootCurrent: 0001

BootOrder: 0006,0005,0004,0000,0001,0002,0003

Boot0000* EFI VMware Virtual SCSI Hard Drive (0.0) PciRoot(0x0)/Pci(0x10,0x0)/SCSI(0,0)

Boot0001* EFI VMware Virtual SATA CDROM Drive (1.0) PciRoot(0x0)/Pci(0x11,0x0)/Pci(0x4,0x0)/Sata(1,0,0)

Boot0002* EFI Network PciRoot(0x0)/Pci(0x11,0x0)/Pci(0x1,0x0)/MAC(000c29e39f55,0)

Boot0003* EFI Internal Shell (Unsupported option) MemoryMapped(11,0xeb58018,0xf07e017)/FvFile(c57ad6b7-0515-40a8-9d21-551652854e37)

Boot0004* Ubuntu HD(1,GPT,571f2dec-9a6c-4c0d-a363-1b31e63b6634,0x800,0x1dc800)/File(\EFI\ubuntu\shimx64.efi)

Boot0005* rEFInd Boot Manager (direct)   HD(1,GPT,571f2dec-9a6c-4c0d-a363-1b31e63b6634,0x800,0x1dc800)/File(\EFI\refind\grubx64.efi)

Boot0006* rEFInd Boot Manager HD(1,GPT,571f2dec-9a6c-4c0d-a363-1b31e63b6634,0x800,0x1dc800)/File(\EFI\refind\shimx64.efi)
Run this command to delete it:
efibootmgr -B -b {boot number}
You can even use this time to reorder the boot order using efibootmgr -o {boot numbers in the order you want seperated by comma}
Finally, run this command to clean up the rEFInd entry:
cat << EOF > /boot/efi/EFI/ZBM/refind_linux.conf
"Boot default"  "quiet loglevel=0 zbm.skip"
"Boot to menu"  "quiet loglevel=0 zbm.show"
EOF
We will update the fstab file:
nano /mnt/etc/fstab
Delete the UUID line for the Ubuntu root partition as well as the swap image. Here is my before:
# /etc/fstab: static file system information.
#
# Use 'blkid' to print the universally unique identifier for a
# device; this may be used with UUID= as a more robust way to name devices
# that works even if disks are added and removed. See fstab(5).
#
# <file system> <mount point> <type> <options> <dump> <pass>
# / was on /dev/sda2 during current installation
/dev/disk/by-uuid/eeea742f-d95@-4d72-931@-f439fff8b33e / ext4 defaults 0 1
# /boot/efi was on /dev/sdal during cur tin installation
/dev/disk/by-uuid/C13C-B26A /boot/efi vfat defaults 0 1
/swap.img none swap sw 0 0
Here is the after when I was done editing:
# /etc/fstab: static file system information.
#
# Use 'blkid' to print the universally unique identifier for a
# device; this may be used with UUID= as a more robust way to name devices
# that works even if disks are added and removed. See fstab(5).
#
# <file system> <mount point> <type> <options> <dump> <pass>
# / was on /dev/sda2 during current installation

# /boot/efi was on /dev/sdal during cur tin installation
/dev/disk/by-uuid/C13C-B26A /boot/efi vfat defaults 0 1
Press Ctrl + X to save and press Y and press Enter at the file name. If you made a mistake, press N instead and run the nano command again to try again.
Now, we export the pool:
umount -n -R /mnt
zpool export zroot
Finally, we can open Gparted to delete the Ubuntu partition. Also unmount the EFI partition. If you want to use a swap partition, you can create it here. Note that the swap partition created by Gparted is unencrypted. If you are using encryption with ZFS, you likely want to omit the swap partition. Once done, it’s time to grow the ZFS partition. Gparted does not support it. Therefore, we will jump into cgdisk. Run cgdisk {disk path}. Use the up/down arrow key to select the ZFS partition. Then, use the left/right arrow keys to go to Info and press enter. Note down the first sector. Then, use the arrow keys to go to Delete to delete the partition. Then, go to New using the arrow keys. Make sure the first sector is correct. Press Enter to keep it default for the last sector. Finally, type bf00 for the hex code. Give the partition name or leave it blank. Finally, use the arrow keys to go to Write and press enter. Then, use the arrow keys to quit. If it gave a message of the kernel using the old partition tables, run partprobe {device path}. If it still gives an error, reboot.
Finally, let’s expand the partition as well as import by partition UUID (note if you have rebooted, make sure to do sudo -i first so you don’t need to add sudo before the commands every time):
zpool import -d /dev/disk/by-partuuid/ zroot
Now, if you run zpool status, you will see that it uses the partition uuid instead. Finally, it’s time to expand it. Not the partition uuid in the zpool status command. Then, run this:
zpool online -e zroot {partition uuid}
You will notice the size increased in zpool list. Finally, export the pool with zpool export zroot and reboot.
After restarting, it will likely say “verification failed”. Press Enter on Ok, and press Enter again to enter MOK management. Go to Enroll hash from disk. Find the ESP partition (if you choose the wrong partition, press Esc to go back) and go to EFI/refind/grubx64.efi and choose Continue, then Yes. Finally, go back to Enroll hash from disk and go to EFI/ZBM/VMLINUZ. Choose Continue, then Yes. Finally reboot and you should boot into rEFInd. Find VMLINUZ and press Enter. You should boot into ZFSBootMenu. Congrats! You are booting off of ZFS using ZFSBootMenu.